

meta data for this page
Fast Imager
TODO:
- Finish rewrite of content.
- Screenshots.
Overview
The Fast Imager is designed to quickly image unprotected floppy disks and to recover data from damaged, unprotected disks. It displays its progress and highlights bad sectors. Bad sectors can be retried multiple times in hopes of getting a clean image.
The Fast Imager can save the image in many formats, depending on the source disk, including platform-appropriate image files (like DSK and WOZ for Apple II disks), as well as individual files. The Fast Imager can not write a2r files.
UI
Track/Sector Grid: The track/sector grid shows the status of each sector that the Fast Imager has read. Tracks are the columns, sectors are the rows. Each cell is colored to show its status:
| Color | Status |
|---|---|
| [green] | Block read successfully. |
| [blue] | Block read in progress. |
| [red] | Block read with errors. |
Imaging a Disk
⚠️ Before you begin you should clean your drive head and inspect each disk for damage prior to imaging.
The basic steps are:
- Insert a disk and click
Image Disk. The drive will seek to track 00 and begin reading the data on the disk into memory. - Enter a name for the image in the
Save Astext field. This field is editable even while the disk is being read. See [naming images] below for some tips. - Click
Retry Badif there are bad blocks. The Fast Imager will try read the bad blocks (and only the bad blocks) again. You can repeat this as many times as you would like. If a block can't be read after several tries, see [recovering bad blocks] for some advanced techniques. - Wait for the image to finish.
- Select a format and click
Save. You can save the image in as many formats as you would like until you start imaging the next disk. See [image formats] for an explanation of all of the supported image formats. See [saving multiple images] below for some tips on organizing images.
Tips, Tricks, and Gotchas
Tips & Tricks:
- Fast-imaging can be useful for copy protected disks if there is a normal filesystem and you want to export the exposed files individually for use outside the disk image (for example, Wizardry or Ultima V save game files).
Gotchas:
- Some copy protected disks may appear to successfully fast-copy but will not actually boot (or behave correctly if the protection check is deferred). If you’re imaging a commercially produced disk, even if its a copy, it may be safer to image it with the Flux Imager.
While the underlying concepts are similar, which screen you see depends on whether a 5.25″ or 3.5″ drive is connected.
Concepts Common to 5.25″ and 3.5″ Disks
- When ready to begin, insert a disk and click “Image Disk“. The drive head will seek to track 00 and begin reading the disk.
- Green block: Block read successfully
- Red block: Block read with errors
- Blue block: Block read in progress
- All data is read into memory until saved or discarded.
- You can begin imaging a disk and specify the file name, save folder and disk image format while the read is in process or after it is complete.
- The same disk image can be saved multiple times to different formats.
- If a block was not successfully read, no partial data is stored in memory or will be written to any disk image. (NOT TRUE as of 1.60)
- If you want to attempt to salvage the partial reads of bad blocks you should instead use the Flux Imager
- If after reading a disk you have one or more bad reads (red blocks) you can attempt to re-read them as many times as you wish.
- Once a block has been successfully read it will turn green and no attempt will be made to re-read it.
- The “Retry Bad” button will be disabled if there are no red blocks that require being re-read.
- For the Fast Imager, no one particular disk format has an advantage over the other.
- You can always re-load a disk image into the Disk Analyzer and re-export it in a different format.
- The one exception is the WOZ format natively supports metadata.
- Only WOZ can store additional metadata, and exporting a WOZ image as any other image type will not propagate the metadata to that other format.
- The Save button is disabled until both some information was successfully read off a disk and a file name has been specified.
Reading 5.25″ Disks
[image Fast Disk Imager 5.25“]
- If the “Clean Head” and “Image Disk” buttons are not enabled as shown above, ensure that a 5.25″ disk drive is properly connected to the AppleSauce and that the AppleSauce is connected to the host computer.
- By default each track is read twice to improve confidence that the data was read correctly (double capture)
- If you do not want this additional verification you can select “Image disks faster by not validating with double captures”.
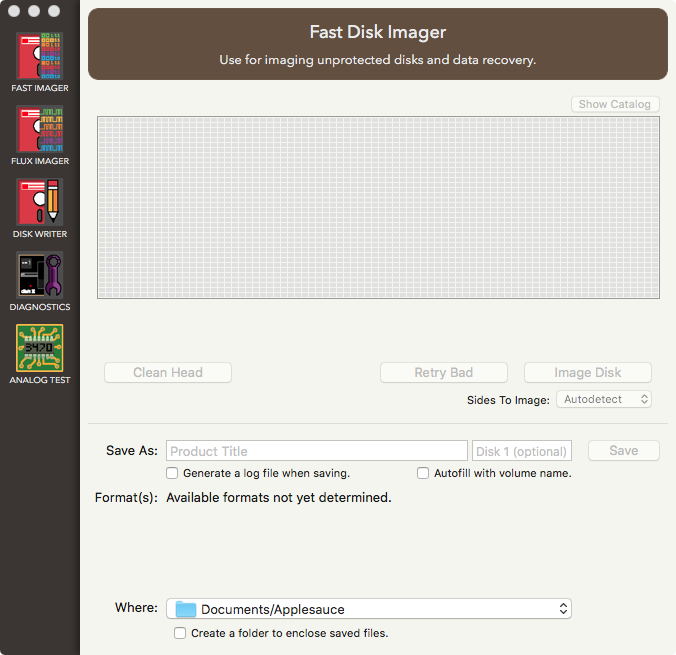
Reading 3.5″ Disks
 ⚠️ This screenshot needs updating.
- If the “Clean Head” and “Image Disk” buttons are not enabled as shown above, ensure that a 3.5″ disk drive is properly connected to the AppleSauce and that the AppleSauce is connected to the host computer.
- By checking “Autofill with volume name if available”, AppleSauce will populate the “Save As” field with the disk volume name if the inserted disk is in a format it understands.
- There is no option to “Image disks faster by not validating with double captures” because 3.5″ disks have a strong checksum on each block and double capture is not necessary.
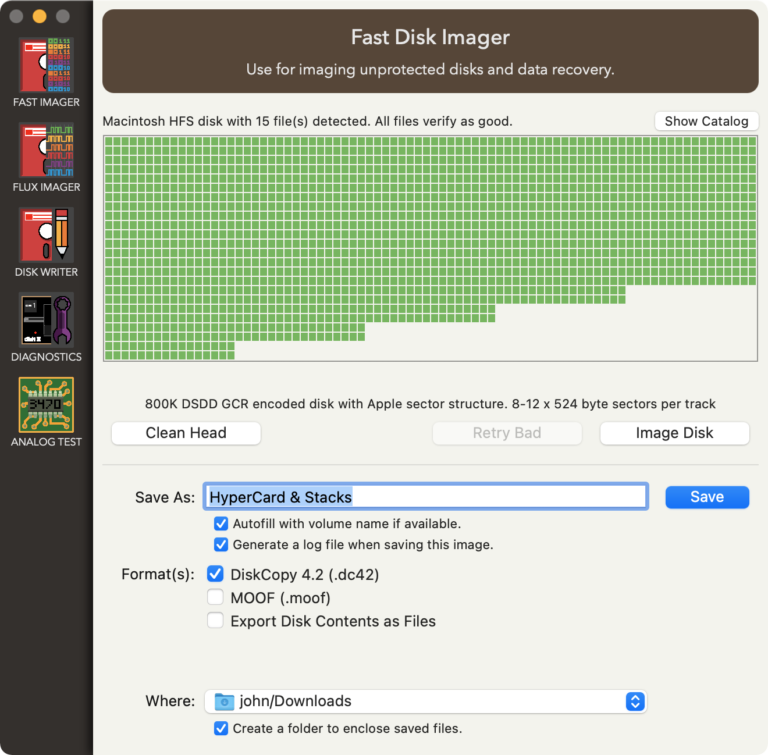
[image 3.5” Disk with Some Bad Blocks]
In the example above, most of the disk was read successfully. However the end of the disk had some read errors. If you are confident that the red blocks do not contain valid data, you can proceed to save the disk image. In the example above, 122 files were detected in the disk image, and they all verified as good. For this specific disk, it is probably unnecessary to attempt to retry the bad blocks.
[image 3.5“ Attempt to Read Bad Blocks]
Should you attempt to retry reading the bad blocks anyway, the blocks currently being re-processed appear in blue. None of the first group of bad blocks was re-read successfully so they remain red.