meta data for this page
Getting Started
If you are reading this page, then I am assuming that you have just received your Applesauce hardware in the mail. This is a quick rundown of how to get things connected up and running.
The First Rules of Applesauce
- Always unplug the USB cable to your Applesauce before connecting/removing drive connections!
- Never connect more than one drive at a time to your Applesauce!
- Power the floppy drive with the Applesauce. Or if you don't, power up the Applesauce before powering up the floppy drive and power down the drive before powering down the Applesauce to keep from causing damaging power backfeed.
What Parts Do You Need?
Applesauce is a pretty self-contained system. The primary functionality of the unit is powered solely by the USB port on your computer. It can get fairly hungry for power at times (500mA+) and if you have an older computer with weak USB ports, it may cause your Applesauce to be unstable. If this is the case, you should use a powered USB hub to provide lots of power for the Applesauce.
You also need to have an +12V 2A AC/DC Adapter (see details towards the bottom of this page). This power supply is used solely to power the attached floppy drive. In just about all cases, you should be powering your floppy drive from the Applesauce unit. This way, the drive can be turned on and off as needed and the Applesauce will be able to monitor power conditions and usage. The only time you should not have your drive plugged into Applesauce is when it requires voltages other than the provided (+12V, +5V, and -12V) or when the drives requires more then 1.5A.
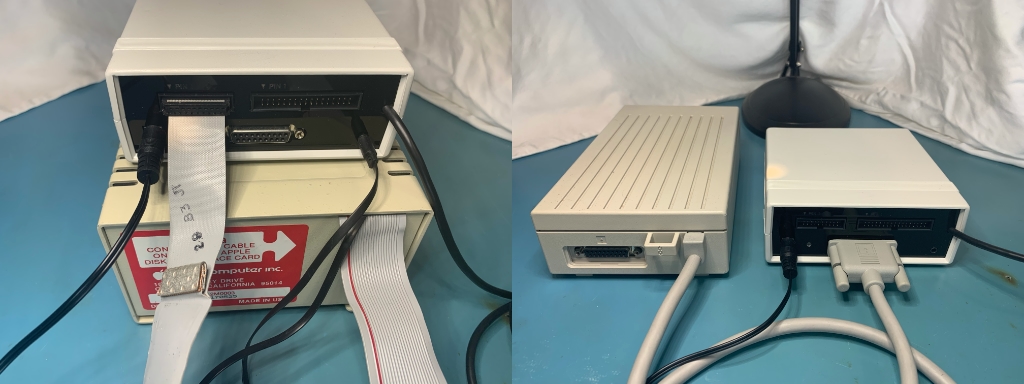
If you are plugging in an Apple drive (either to the 20-pin port or the DB-19), then you will simply plug in the single cable as signals and voltage are provided through the single connection. If using the 20-pin port, be sure that pin 1 of your cable (red stripe) is on the left side. If you have an older drive with the rainbow cable, you want to ensure that the ribbon cable is pointing downward when plugged in. If you are planning to use your drive for flux imaging disks, you will need to have a sync sensor installed into your drive and this will be plugged into the sync sensor port on the back of the Applesauce. There is no need to install the sync sensor right now, let just have a bit of fun and make sure everything is working well first.
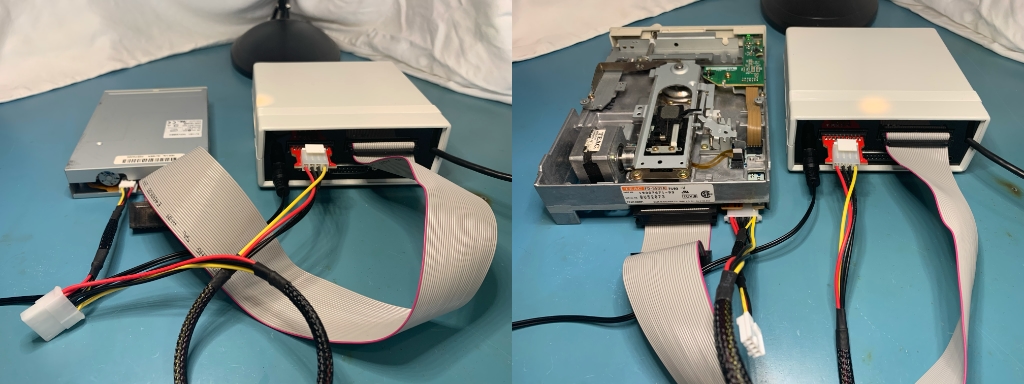
If you are plugging in a PC drive to the 34-pin port, then you will connect that as well as the power cable (part of the PC Drive Cable Kit) that goes between the 20-pin port on the Applesauce and the drive. The power cable kit is manufactured specifically for Applesauce and therefore isn’t available anywhere else. Hit the Order page if you didn’t purchase one. When plugging in the 34-pin ribbon cable into the Applesauce, the red stripe on the cable is pin 1 and should be on the left side. The other end of the cable has two connectors, the card edge connector is for 5.25 drives and is polarized so it can only connect to the drive in one orientation. The other connector (34-pin IDC) is for 3.5 drives. Many 3.5 don’t have polarized connectors on them, so you will need to look for any markings on on the casing or PCB around the connector. There is often an arrow or a number 1 (or 2) that should give you a clue as to how to plug it in. The red stripe on the cable is pin 1 on this end as well.
Installing and Running the Client Software
The Applesauce client software is available for download here.
When your Applesauce is plugged into the USB, it will go through a quick startup sequence and then wait patiently for the client software to initiate a connection to it. While it is waiting, the LINK light will be flashing green. When you start the client, it will connect to your Applesauce and the LINK light will glow solid green.
When the Applesauce software is launched, it may notify you that an update is available. In order to keep your software and hardware up to date, the software will check for updates and allow you to download them automatically. The software also has the ability to update the firmware of the Applesauce hardware. If such an update is required, then you will receive a message when starting the software.
Setting Up a Drive Profile
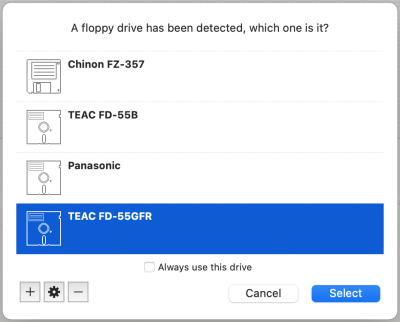
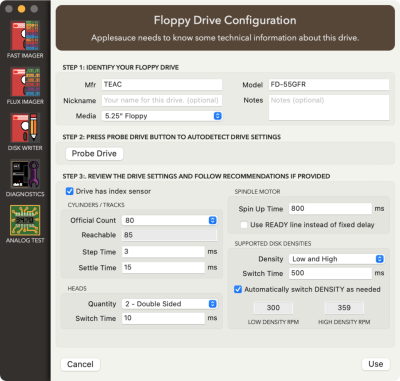
When the client detects an Applesauce, it will try to identify the type of drive that is connected. Once it does that, it will ask you to identify exactly which kind of drive it is. The Applesauce client maintains a drive profile for each floppy drive that you use, except for Apple 3.5 Drives (and SuperDrives) as these can be queried for all information at runtime. A drive profile contains all of the information the client needs to be able to work with the drive. If you do not have an existing profile for the drive, then you will need to hit the gear icon to add a profile.
You will need some blank disks for the profiling process. If your drive supports both high density and low/double density disks, then you will need one of each for the test. (The disks don’t necessarily need to be blank, but they will be partially overwritten in a way that will destroy any existing formatting in order to perform tests, so make sure they aren't disks you care about. Always reformat the disks before using them with the Diagnostic Tools.)
At the end of the profiling process, the client will let you know if it encountered any issues with the drive that prevent proper use with Applesauce. If you get the OK, then hit the Save & Use button and you are in business. If there were issues, then you may need to make adjustments to the drive jumper settings. This can be a bit of a frustrating experience if you are new to the world of imaging disks.
Your First Image
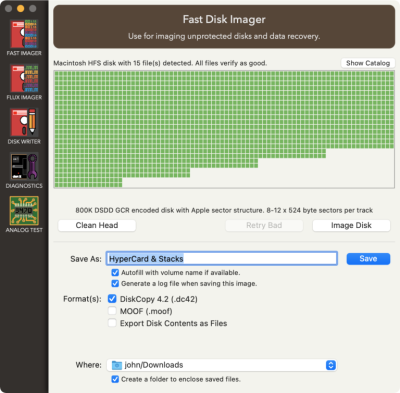
For our first image test, it is best if you have a known-good and unprotected floppy to try imaging. Something like the Apple DOS 3.3 System Master disk, MS-DOS disk, or such will work great. From within the client software, you can select the Fast Disk Imager. Press the Image Disk button and you will hopefully see a completely green grid as shown below. The blocks represent all the sectors on the disk, and green ones indicate that the sector was successfully captured. If you have red blocks, then this may mean that your drive is either not connected properly or that you may need to clean the drive head.
If this was successful, then you should be good to go. If you want to go install a sync sensor now, you can head to the Sync Sensor page for details on the process.


