meta data for this page
This is an old revision of the document!
Disk Writer
The Disk Writer function takes a floppy disk image as input and writes the contents to a physical floppy disk. The Disk Writer can also format blank floppy disks directly without a disk image. To do so you'll need an appropriate drive connected to the AppleSauce.
Background Information on Disk Writing
When writing a physical disk, it's crucial to understand the differences between disk image file formats. Floppy drives convert a weak magnetic signal from the disks into a digital electrical signal, which the computer can interpret as data. This process inherently introduces noise and potential timing inconsistencies. These inconsistencies become especially prominent when dealing with raw flux captures, such as .a2r, .scp, or .flux formats.
Raw Flux Streams:
- Raw flux captures (.a2r, .scp, .flux) are essentially a direct recording of the magnetic flux transitions on the disk surface.
- They capture the disk's data at a very low level, including all the nuances of the disk's magnetic field. This level of detail includes timing variations, minor physical imperfections, and even artifacts of the disk drive used for reading.
- While this format is excellent for archiving a disk in its most authentic form, it poses challenges for writing. The exact replication of timing and magnetic characteristics can be difficult, especially if the writing drive's characteristics differ from the original reading drive. Writing directly from these formats can potentially magnify noise from the original recording. Think of this as having the photocopy of a photocopy problem, each round trip introces more noise. Writing from a raw flux stream can sometimes be necessary if the data can't be captured in an interpreted floppy format. The process of writing directly from these formats is covered in the Advanced Disk Writing section.
Sector Data Formats:
- Interpreted formats like .img or .imd are more abstracted representations of the data on a floppy disk.
- These formats generally have validated the underlying data against checksums or other error-recovery mechanisms, reducing or eliminating noise.
- These formats organize data into a structured form of sectors and tracks closer to the logical data structure used by operating systems.
- Interpreted formats strip away the low-level details like exact magnetic flux transitions and focus on the actual data contents. This makes them more consistent and predictable for writing purposes.
- When writing a disk using these formats, the floppy controller and drive handle the conversion of this structured data back into the magnetic signals, ensuring compatibility across different hardware.
In essence, while raw flux captures are ideal for preservation and analysis, interpreted formats are more reliable for the actual process of writing data to a floppy disk. This is because they abstract away the hardware-specific nuances, eleminate noise, and allow for a more consistent disk writing experience. Some copy-protection mechanisms prevent creating an interpreted format as the protection mechanism relies upon invalid data or a specfic validation exception to ensure the disk has not been copied. Back in the day this would have prevented the actual hardware from making a valid copy of the disk. If the disk can be interpreted into an interpreted floppy format, you should write physical floppies from these sector data format images. The AppleSauce software can save many raw flux captures into a sector data format simply by opening the flux capture file and then selecting Export Disk Image or Files… from the File menu.
Writing Disks
If you haven't already, setup the drive you'll use for writing. Only one drive should be connected to the AppleSauce at a time.
1. Click the Disk Writer icon in the left-hand navigation menu.
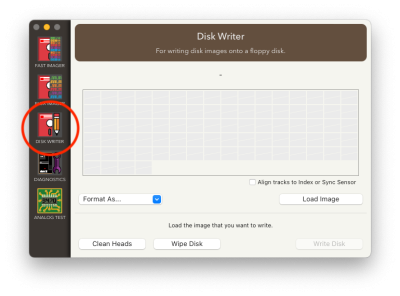 If the AppleSauce hardware is not connected via USB you'll see a notice to “Connect the drive that you want to use for writing.” at the bottom of the screen. If the AppleSauce hardware is ready to write a disk you'll see the notice “Load the image that you want to write.” at the bottom of the screen.
2. Click the Load Image button and select the disk image that you want to write. As discussed above, raw flux capture formats will not be selectable. Select the disk image from the standard open file dialog and click the Open button.
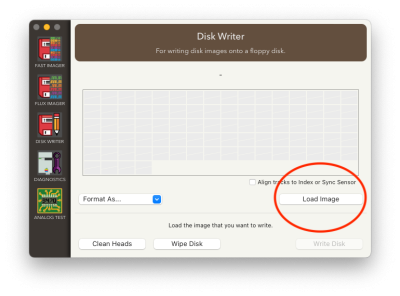
3. The name of the disk image you selected will appear above the gray boxes. Click the Write Disk button in the lower left corner of the screen.
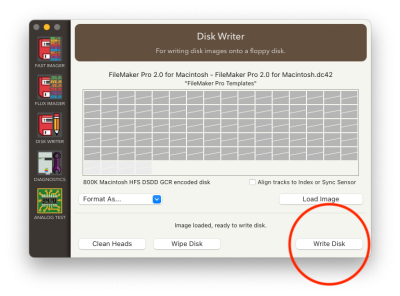
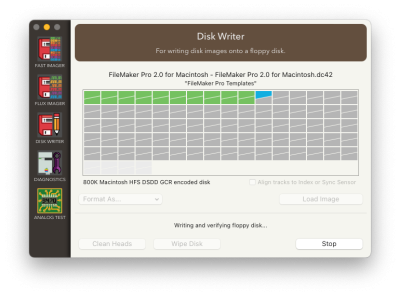
4. The disk will start to write, you can hear the floppy drive writing and the colored bars will show the progress. The top-half of the square is the side A of the disk and the bottom half of the box is side B of the disk. The colors indicate:
- A gray box indicates the sector has not yet been written.
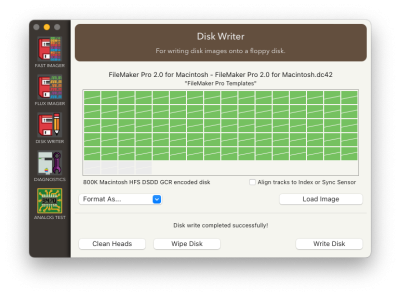
- A green box indicates the sector has been written and verified correct.
- A blue box indicates the sector currently being written.
- A red box indicates a sector was written but failed the verification process.
5. When the process completes the bottom of the screen will display a message “Disk write completed successfully!”
